Duplex stainless steels (DSS) are recommended as the Material of Construction (MOC) for process equipment in chemical process industries (CPI) in preference to standard austenitic stainless steels for several reasons. The most important reasons are:
- better resistance to chloride stress corrosion cracking (CSCC),
- better mechanical strength without much loss in ductility,
- better thermal conductivity,
- better performance to cost ratio.
These properties make duplexes the preferred MOC for equipment such as pressure vessels, reactors, piping, flanges, heat exchanger tubes etc. However in practice these advantages are realized only if proper precautions are exercised with respect to choice of the right grade of duplex, fabrication including welding, storage before actual usage etc.
Case study 1 – Cracking close to pipe flange weld before commissioning A
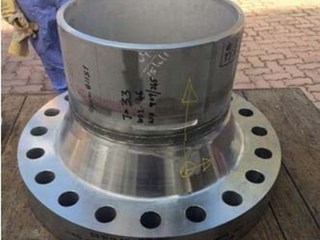
16” NB WNRF 900# S60 ASTM A182 Gr. F51 DSS flange, welded to a seamless pipe at the fabrication site, developed a circumferential crack which was noticed after welding and before putting into service. Only one of several such flanges, manufactured (forged) with the same material, F51DSS, with the same heat number, followed by the same heat-treatment cycle, and supplied as per the same order, displayed cracking after welding at the assembly-fabricating shop after repair welding. The crack was circumferential at the neck hub base, a little away from the flange to pipe weld heat affected zone (HAZ). The cracking was in the parent material of the flange as shown in Images 1, 2 & 3.
From the image in the header of this article, one can see that some repair welding (rewelding of the weld followed by some grinding) seems to have been done on the cracked assembly. No such repair was done on the welds of the non-failed assemblies. One can also see that the weld beads are not uniform on the cracked assembly. Instead of regular uniform ripples which can be seen towards the extreme right, irregular ripples and grinding marks can be seen on the portion where crack was noticed. This indicates that some repair welding (re-welding of the weld followed by grinding) has been done only on the cracked flange.
Analysis: The heat treatment carried out during flange manufacturing was solution annealing from 1055° C, followed by water quenching.
Dye Penetration Test (DPT): Image 3 shows OD surface view at the flange and pipe weld joint in DP tested condition.
All the tests carried out on the supplied flange, namely chemical analysis, hardness and microstructure were satisfactory as per specification ASTM A-182 Grade F-51 DSS expected out of wrought DSS 2205. The Scanning Electron Microscope (SEM) image of the fracture surface of the crack showed it to be brittle fracture. Tensile testing was carried out on the test specimen drawn from the affected flange in transverse direction. The results are reported in Table 1. One can notice that the cut sample shows very low ductility as compared to the required level, indicating that the sample is brittle in nature.
The material test certificate corresponding to the original supply of all the flanges indicated acceptable % elongation as longitudinal 28.6% and transverse 28.4 %, as per the specification. Such a large difference would have come about as a result of slow cooling after the repair welding. The particular, only one among many supplied, flange which has cracked has become brittle close to the weld zone during cooling of the repair weld done in this flange. This phenomenon is known as
temper embrittlement or 475 degree embrittlement
.
This occurs in all chromium-containing alloy steels including stainless steels and DSS. Either during heat treatment or during welding, in the present case repair welding, if the cooling rate is very slow (as compared to quenching) over the temperature range 500 to 380 deg C this embrittlement occurs in the base metal (in this case the flange) very close to the weld. After such a slow cooling in the above temperature range, a normally ductile SS shows a brittle behavior.
Since thermal stress invariably occurs when the weld is solidifying and cooling, the embrittled base material gets cracked.
Conclusion & recommendation
Brittle cracking has occurred due to slow cooling, after repair welding, through the temper embrittlement range of 450 deg C to 550 deg C. Slow cooling after welding should be avoided to get the full advantage of DSS. The occurred cracking is an isolated incident, which occurred on only one piece out of several supplied and there has been no quality issue in the supplied flanges.


