The European Synchrotron Radiation Facility (ESRF) was upgraded in 2021 to an ESRF-Extremely Brilliant Source (ESRF-EBS), making it the source of the most intense high-energy (6 GeV) X-rays in the world. This ‘fourth-generation’ synchrotron produces an X-ray beam 100 times more brilliant and coherent than any other source today, allowing imaging from the micrometre to the nanometer scale and providing new opportunities for science applications. ESRF-EBS has already started to play a major role as a partner in various research activities.
By A.F. Ciuffini, European Synchrotron Radiation Facility, France Email: andrea.ciuffini@esrf.fr
The upgrade of the European Synchrotron Radiation Facility ESRF – EBS (Extremely Brilliant Source) was completed in 2021. It became the first IV-generation high-energy synchrotron, increasing the brilliance and coherence of X-ray beams by a factor of 100 compared to present-day synchrotron light sources. The use of this source provides X-rays much brighter than the X-rays used in typical industrial instrumentation.
This capability may be exploited in many practical ways for metallurgy applications. In morphological measurements, synchrotron-based μCT is drastically reducing scan times and, at the same time, improving image quality as compared to laboratory-based μCT tools. The high photon flux and the high coherence of X-rays generated by synchrotrons, which also enable X-ray synchrotron nano-tomography allowing the fine characterisation of the microstructure in 3D at the nanometer scale, revealing crucial information on the microstructure inherited by the fabrication path in residual stress measurements, achieving higher precision and measurements depth. In X-ray powder diffraction (XRPD), the acquisition time for measurements can be reduced to seconds (1).
ESRF-EBS has already started to play a major role as a partner for various research activities, and the following will present some highlights:
- combined use of X-ray diffraction contrast tomography (DCT) and multi-distance phase contrast tomography (PCT) to characterise fatigue crack nucleation and growth in duplex stainless steel AISI 318LN;
- in-operando synchrotron X-ray diffraction (XRD) study of the friction behaviour of austenitic stainless steel AISI 321;
- stress relief of the residual stresses of an additive manufactured AISI 316L arch structure (funded by the European Union’s Horizon 2020 research and innovation programme under grant agreement no. 953219 / EASI-STRESS project);
- new high-throughput X-ray powder diffraction system on ID31, enabling the measurement of thousands of samples in record time (funded by the European Commission under grant agreement no. 870313 /Sustainable research at micro and nano X-ray beamlines).
Characterising fatigue crack nucleation and growth in duplex
3D characterisation of metals may be realised through serial sectioning electron backscatter diffraction (EBSD) experiments. However, as a destructive technique, it does not provide the possibility to follow the microstructure evolution quasi in-situ.
The combined use of X-ray DCT and multi-distance PCT allows for the unique possibility to reconstruct the 3D microstructure of a two-phase material while simultaneously determining the crystallographic orientation of each grain. Due to the very high resolution achieved, inter-phase grain boundaries can also be measured. The non-destructive nature of these techniques allows this characterisation for cyclic deformation with intermittent hold times. The investigated metal is a duplex stainless steel AISI 318LN. To ease the experimental investigation, grain coarsening was carried out by annealing the material at 1250 °C for 4 hours, followed by cooling down to 1050 °C within 3 hours at a constant cooling rate and water quench. The resulting material has a lamellar microstructure with about 50% austenite and 50% ferrite, and the mean grain diameter was increased to 33 μm and 46 μm, respectively.
The fatigue sample was realised and fatigued at a stress amplitude of 400 MPa. The test was stepwise interrupted, to monitor the short fatigue crack propagation. By means of the PCT technique, the crack was examined non-destructively and represented in 3D. The fatigue crack initiated at the phase boundaries between an austenite grain and a ferrite grain. Clearly, the trans-crystalline crack propagates roughly in a half-elliptical shape. However, the crack propagation rate obviously shows significant local differences. The crack growth was decelerated when a crack tip approached a phase boundary. On the other hand, an acceleration of crack propagation was always detected when the crack overcame the boundary. The crack has the characteristic zigzag path that is typical of the propagation of microstructurally short fatigue cracks, which propagate along single slip planes under predominant local single slip conditions. Changes in the propagation direction at grain or phase boundaries are caused by changes in the crystallographic orientation (Figure 1). The tomography data were also used to create realistic 3D finite-element models of the microstructure. By means of a crystal plasticity finite-element analysis, the material behaviour under cyclic deformation was simulated. The results were found to be in good agreement with experimental data on the evolution of initial residual stress at the microstructural level and strongly support the identification of the critical fatigue crack nucleation sites. In the duplex stainless steel investigated, residual stresses, built up locally due to cyclic deformation, promote crack nucleation solely in ferrite grains. Further, the results of this work clearly demonstrate the significance
of phase and grain boundaries as microstructural barriers for short fatigue crack growth, both at the surface and in the interior of multi-phase alloys (2).
In-operando synchrotron X-ray diffraction (XRD) study of AISI 321
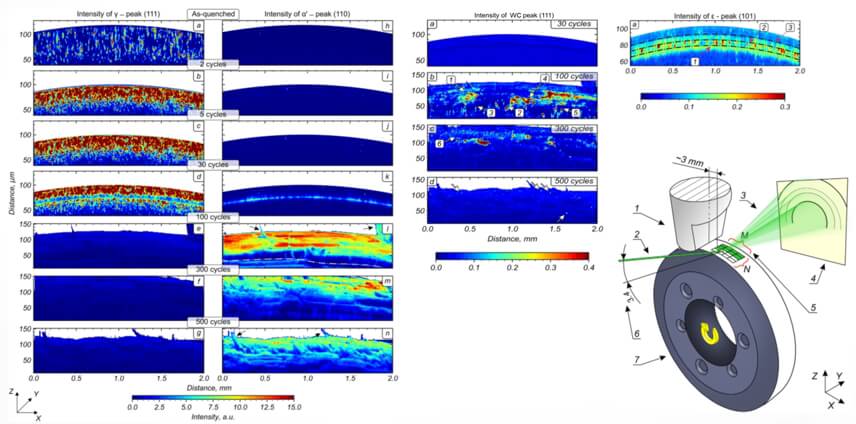
Austenitic stainless steels (ASSs) structure, formed due to friction, has been investigated in many works; however, most use post-mortem analysis. The combination of synchrotron radiation and two-dimensional detectors allows the recording of high-quality diffraction patterns with high spatiotemporal resolution. Applying such methods provides a possibility to probe the material state under different friction conditions and obtain diffraction patterns directly during the experiment/operation with a high sampling rate. In this study, a dry sliding friction test was carried out in pin-on-disk geometry, using AISI 321 as the experimental material. The cemented carbide (WC-20Co) pin was chosen because of its high hardness and wear resistance. The in-operando synchrotron X-ray diffraction (XRD) showed the decomposition of austenite under friction at the sample’s surface, which consists mainly of α’-martensite. It appears via the intermediate formation of ε-martensite, which correlates well with the probability of deformation stacking fault formation in austenite. After 45 friction cycles, a sufficiently thick mechanically-mixed layer (MML), consisting mainly of the α’ phase, has been generated, and the γ−ε transformation continues to occur in the underlying layers, although not observed in the diffraction patterns (Figure 2).
During the experiment, it was observed that the shape of the austenitic phase peaks changes significantly; however, the α’-martensite peaks change little. This is because the newly forming α’ phase initially contains many crystal lattice defects inherited during the mechanically-induced phase transformation.
The friction of AISI 321 steel against the cemented carbide pin is accompanied not only by dislocation and precipitation hardening but also by relaxation processes that consist of the following phenomena: deformation-induced γ-( ε, α’) yransformation, dislocation ordering, and formation of shielded dislocation structures to recover the violation of the phase coherence. This phenomenon appears to lead to a significant increase in wear resistance of the steel surface.
Finally, it has been observed that the primary mechanism of wear is the delamination at the interface of the MML with the materials of the underlying deformed layer (3).
Stress relief of an AM AISI 316L arch structure
Laboratory-based residual stress measuring techniques are often ineffective in assessing the residual stresses on relatively bulky components due to the nature of residual stresses to be assessed and the given material system. However, synchrotron hard
x-rays, with their higher penetration depth, can access those areas more easily, reducing the number of processing steps (e.g. tooling or machining) to investigate residual stress fields. Further, synchrotron hard x-rays allow the possibility of performing this test non-destructively.
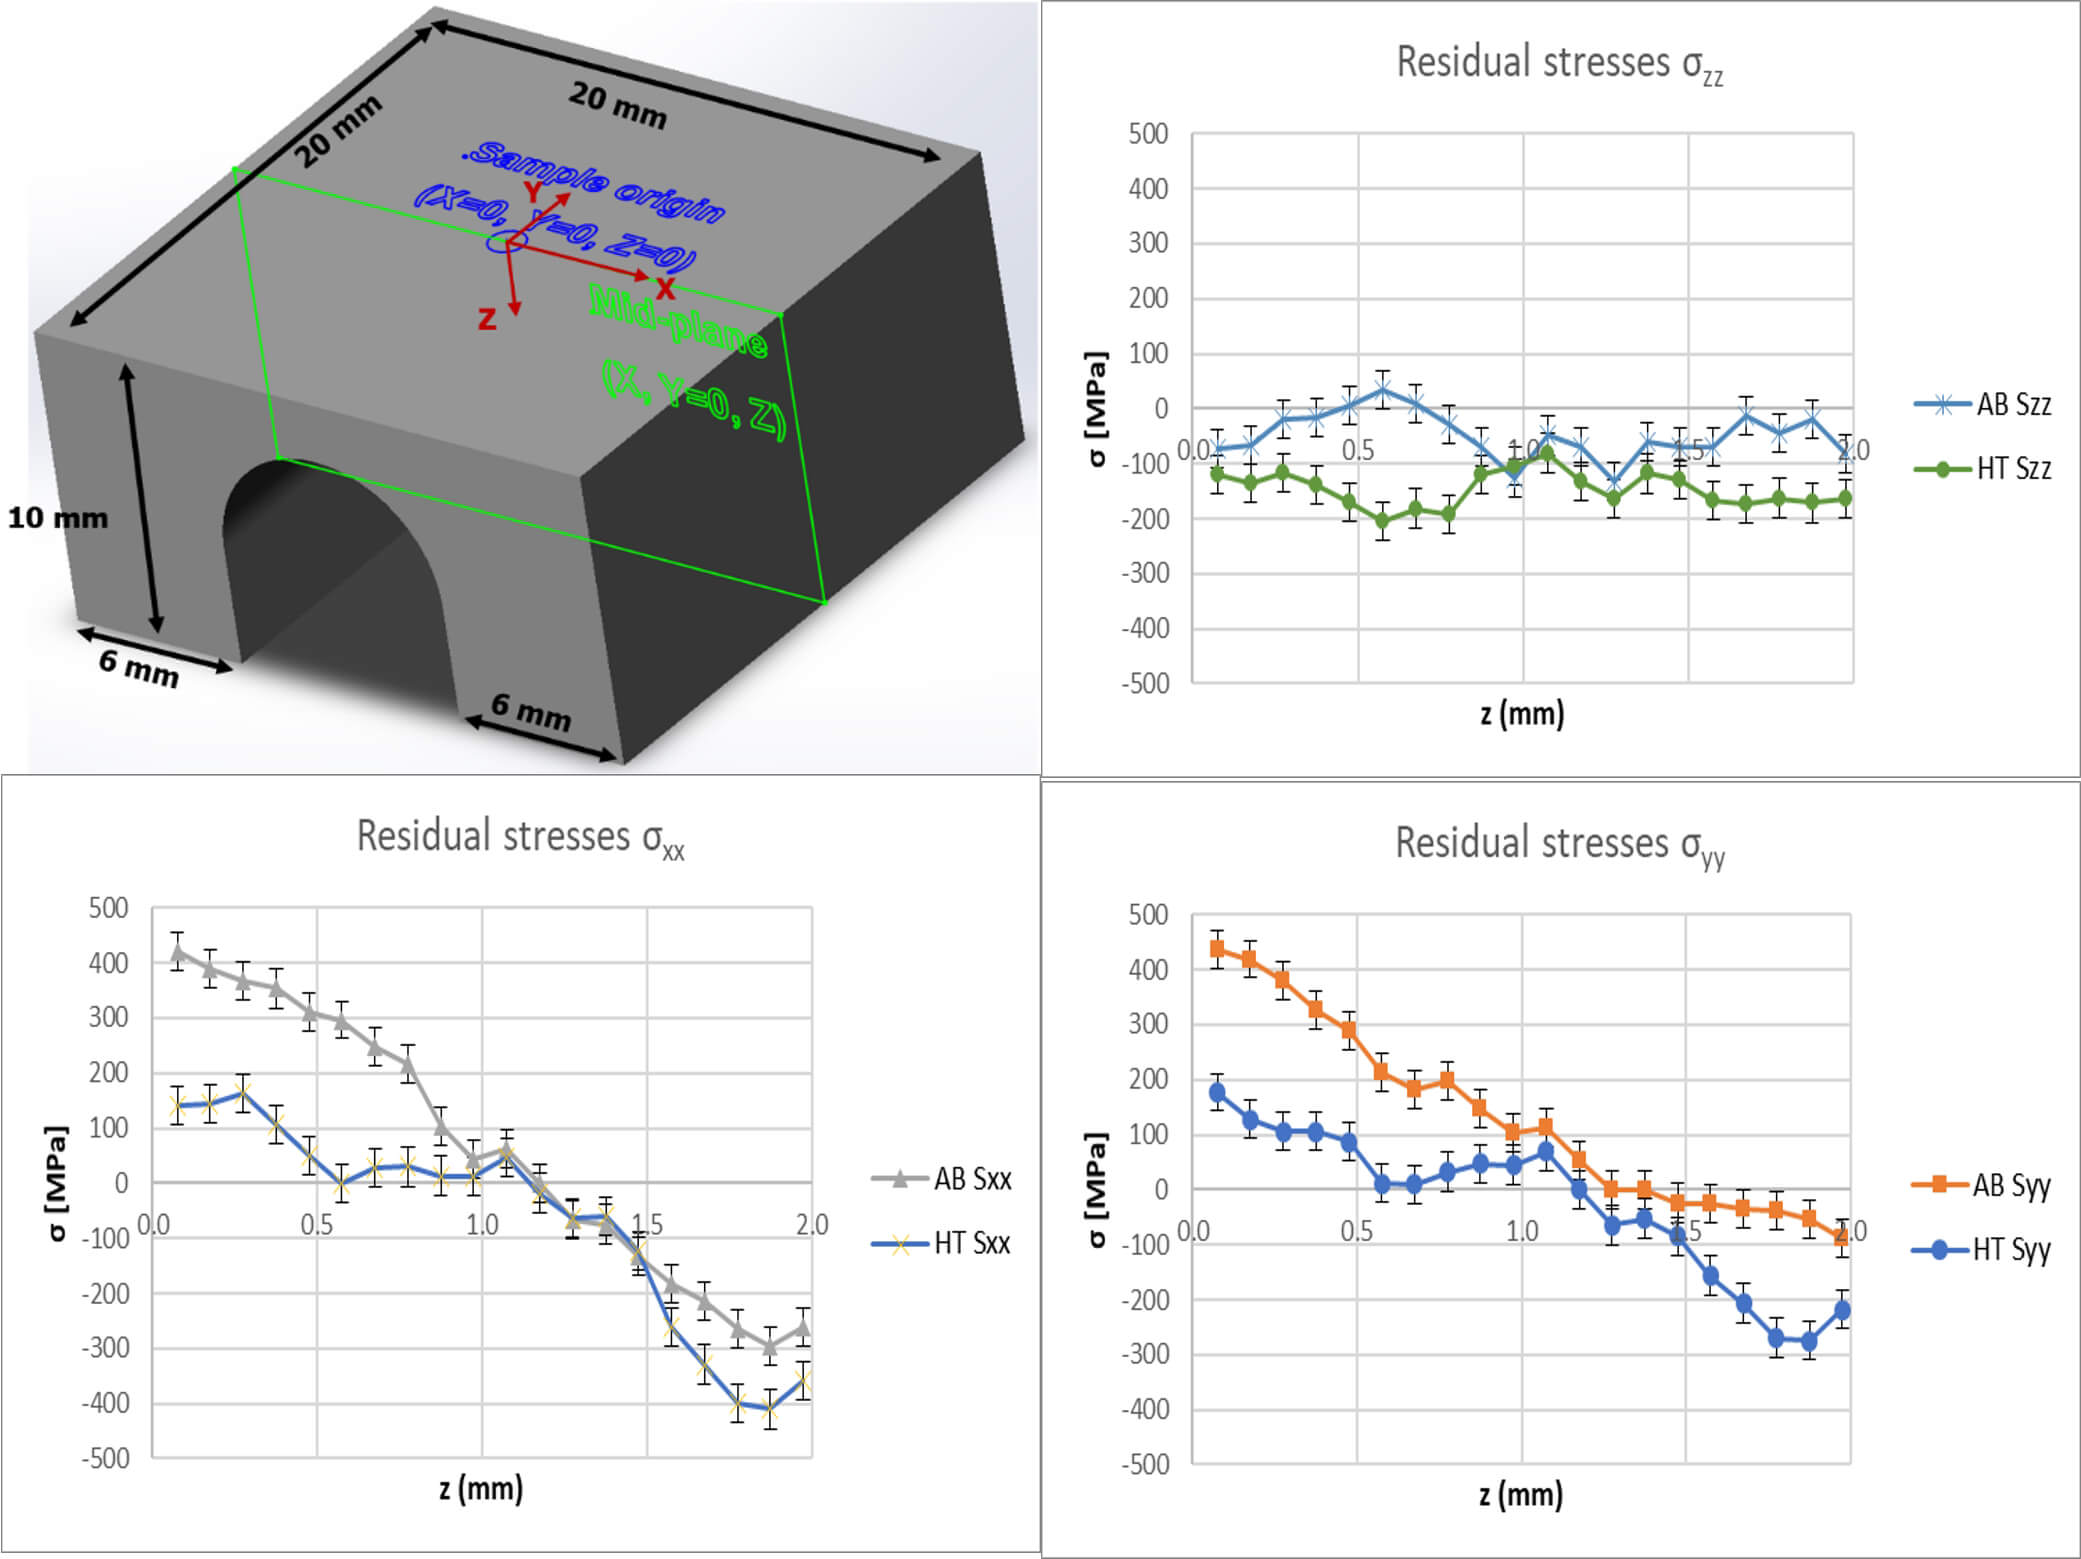
Under the EASI-STRESS project (funded by the European Commitssion under grant agreement no. 953219) an arch concept was selected to measure residual stresses in additively manufactured parts due to its geometry, which lends itself to establishing a triaxial stress state, which has been largely absent from additive manufacturing benchmarks for residual stresses. The as-built (AB) sample has been produced by laser-based powder-bed fusion (L-PBF) in stainless steel 316L due to its very stable austenitic microstructure. The specimen was left attached to its build platform. The effectiveness of stress-relieving heat treatment was also examined. The heat treated (HT) sample was held at 700 °C for 2 hours and then cooled in an inert atmosphere passively. This thermal treatment aims to maximise stress relief whilst preserving the underlying microstructure.
The residual stress measurements were performed at ID15A beamline in x-ray diffraction (XRD) full transmission geometry, using a synchrotron white beam, measuring on two planes (XZ and YZ) with a gauge volume of 0.2 × 3.4 × 0.05 mm. The raw powder spectrum was used as a stress-free reference.
The measurements of the AB show a plain stress along the centerline (σzz≈0), the magnitudes of the stresses in x and y direction are similar, featured by high tensile stresses proximate to the surface, balanced by compressive stresses at the arch apex.
The HT condition shows the same trends observed for the AB condition; however, the peak in tensile stress has been strongly reduced by approximately 300 MPa. Those regions with a high initial deviatoric stress state respond the most to the relaxation treatment. Further, while in the AB condition, the stresses acting in the x and y were approximately balanced, and there is a subtle difference of approximately 100 MPa at the apex of the arch. The x direction shows higher compression stresses due to the higher level of constraint since more material is present by geometry. A slightly compressive stress, acting along the z direction, balances the discrepancy between x and y directions (Figure 3). Finally, synchrotron XRD in full transmission geometry appears to be promising for non-destructively triaxial residual stress field measurements in relatively bulky components (4).
High-throughput X-ray powder diffraction system on ID31
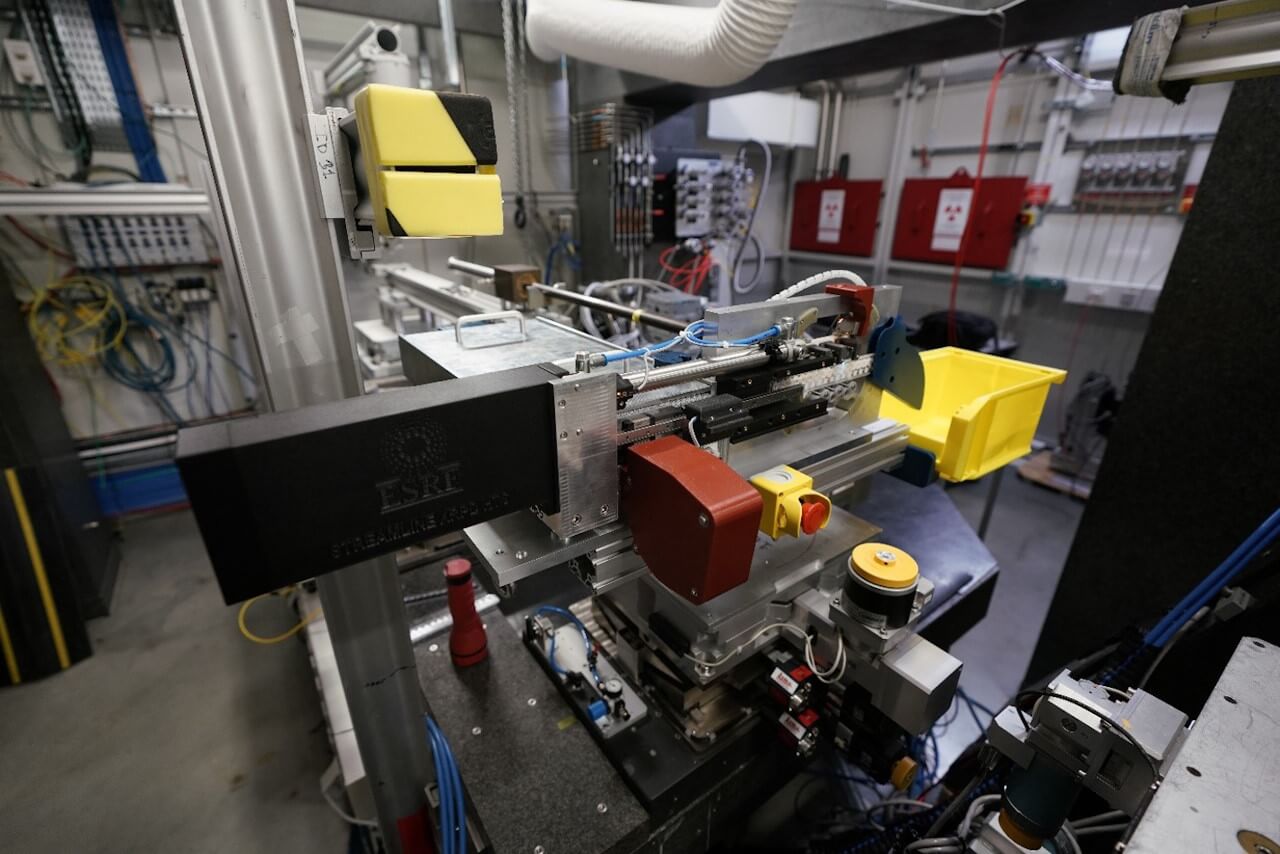
X-ray powder diffraction (XRPD) is one of the essential techniques for the structural characterisation of materials. Thanks to the ESRF’s upgrade, the acquisition time for XRPD measurements can be reduced to seconds, compared to one day using conventional laboratory sources. Thus, an automated, high-throughput sample treatment system was necessary to adapt to faster experiments. Within the STREAMLINE project (funded by the European Commission under grant agreement no. 870313 / Sustainable research at micro and nano X-ray beamlines) and in collaboration with an industrial partner (BASF), a robotic sample-changing system has been developed for high-throughput XRPD measurements (Figure 4), making it possible to measure several thousand samples a day. This fully automated system allows users to send their samples in standardised sample holders and download their pre-treated results remotely.
The sample holder was designed and produced to contain 16 samples in small, individual chambers, each with its own QR code. Each sample can be moved inside its chamber when a vibration is applied to fluidise the powder during data acquisition. The sample holder is ejected after the 16 samples are measured (18 seconds for a 1-second acquisition time per sample), and the subsequent samples are loaded. In this way, the system can fully automatically measure up to 1056 samples within less than one hour. After collecting the raw data, an automated azimuthal integration is applied, and everything is stored in a folder within a hdf5 file with a name generated automatically from the sample QR code, allowing the user to download it remotely after the experiment. In addition, a mail-in sample service will be established to speed up the experiments even further. The service is already in demand with industrial users: BASF is planning to send up to 1000 samples per week to be analysed for battery research, and a steel company is planning to send 32 samples per month to analyse slag content (5).
Acknowledgements
The author would like to acknowledge the following: D. Canelo-Yubero
(Helmholtz-Zentrums Hereon) , P. Staron (Helmholtz-Zentrums Hereon), Guilherme Abreu Faria (Helmholtz-Zentrums Hereon), E. Maawad (Helmholtz-Zentrums Hereon), N. Schell (Helmholtz-Zentrums Hereon), M. Roy (University of Manchester), M. Sánchez Poncela (Arcelor Mittal), J.M. Martínez (Arcelor Mittal), the ESRF Business Development Office, ESRF Sample Environment group and ESRF beamline scientists.
References
- S. Shin, “New era of synchrotron radiation: fourth generation storage ring”, AAPPS Bulletin 2021, 31, 21
- K. Emurlaev, I. Bataev, I. Ivanov, D. Lazurenko, V. Burov, A. Ruktuev, D. Ivanov, M. Rosenthal, M. Burghammer, K. Georgarakis and A.M. Jorge Junior, “Friction-induced phase transformations and evolution of microstructure of austenitic stainless steel observed by operando synchrotron X-ray diffraction”, Acta Materialia 2022, 234, 118033
- B. Dönges, M. Syha, A.K. Hüsecken, U. Pietsch, W. Ludwig, U. Krupp and H.-J. Christ, “Cyclic deformation induced residual stress evolution and 3D short fatigue crack growth investigated by advanced synchrotron tomography techniques”, Materials 2021, 14, 1562
- https://www.easi-stress.eu/
- https://www.esrf.fr/home/news/tech-talk/content-news/tech-talk/techtalk13.html
Full reference list available on request.


